10 Accessories for Shooting Quality Time-Lapse
Let’s face it: time-lapse has made a big revolution during the last few years, partly thanks to the development of technology and the appearance of numerous devices that provide endless creative possibilities. However, not all of them are necessary for getting good results. Here are ten accessories that should be part of the essential kit of a good time-lapser.
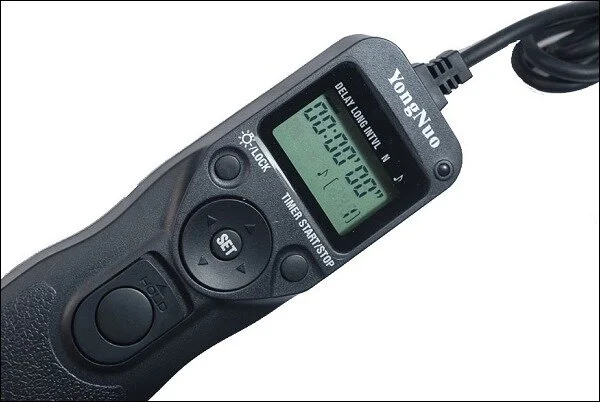
1. Intervalometer. Also known as the remote controller, the intervalometer is the main tool for capturing time-lapse sequences. It enables setting the interval, the number of shots and the duration of the exposures. There are many models on the market, but most are variations of a single device and their menus are almost identical. I advise to buy two of the cheapest, they work just as well as any other and all the remotes tend to die when you least expect it. So it’s essential to have a spare one in your backpack! Avoid wireless versions: although no wires hanging may seem attractive, they are more likely to fail.
2. Tripod. As I have mentioned in my other tutorials, the tripod is the best friend of a time-lapser. It has to be stable and robust because the camera stays put in one position for several minutes or even hours. Furthermore, on many occasions you will shoot using long exposures, so the video stability will depend on the quality of your tripod. I usually use ball heads – I think they are the most practical and they are quick and easy to set up. About the legs – I work with a three-section telescopic carbon tripod, because they are lightweight and very stable. A little tip: when you need extra stability, especially in windy scenarios, I attach a backpack to the tripod with a carabiner and a climbing sling.
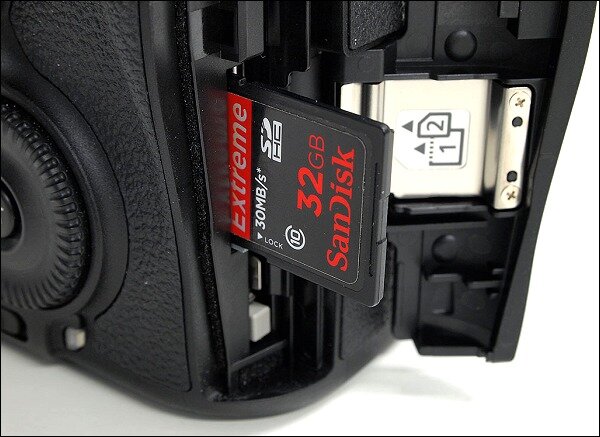
3. Big memory cards. Due to the number of shots you need to take to achieve a time-lapse (at least 250 per shot), memory consumption is very high. Even more so if you shoot in RAW, which you should do to get the best possible results. Depending on the resolution of the camera and the quality you choose, each shoot can take between a few hundred MB to several GB. Therefore, it is necessary that you check how many images can one of your memory cards store to see how many takes you can record during a session. For example: if you use 32 GB cards and one can store up to 1,200 photos in RAW, then you’ll know that you can record about four time-lapses on that card.
4. Wide angle zoom. There is an appropriate lens for every different kind of photography and situation. The most common one for time-lapse is the wide angle zoom. This does not mean you can’t use a long lens, but it is true that for the most popular topics chosen for time-lapse (landscapes, cityscapes, skies and stars) the wide angle is the most suitable. The focal length will depend mainly on the size of the camera sensor. In a full-frame camera it is advisable to use a 17-35 mm zoom, while with an APS-C you will need a 10-20 mm. The speed of the lens is also very important, especially if you like night photography. In this case you should find the fastest one – I would say at least f2.8, because with each stop that you lose you will have to double the duration of the exposure. And remember that we need at least 250…
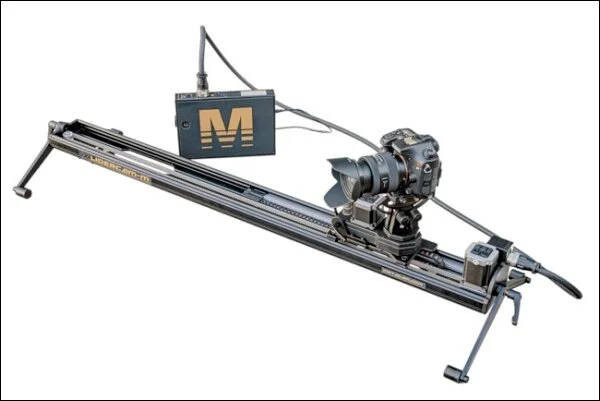
5. Motorized slider. If there is one accessory that has brought dynamism and creativity to the world of time-lapse, it is the motorized slider. This is a tool that enables very slow motion of the camera along an aluminum rail, usually about one meter long. Some models, like the KietaCAM-M, also offer many other possibilities like: panning, HDR and 3D modes, repetitive movements with high accuracy and at different speeds, controlled using a tablet… Once you have made a time-lapse with camera movement you will not want to go back to stills.
6. Neutral density filters. This is an accessory that shows how much this technique has in common with photography. In both fields, neutral density filters are absolutely necessary if you want to get professional looking results. They make it possible to use more open apertures, even at very bright conditions, as well as more creative shooting with long exposures. The most commonly used are the circular threads. If you have lenses with different diameters, you can buy the filters for the biggest and converters for the smaller ones so you save some money. But I recommend you to use a Lee holder and square filters that will be suitable for any lens you have or will have in the future. Then you can also insert neutral graduated filters to light up the difference between the sky and the ground.
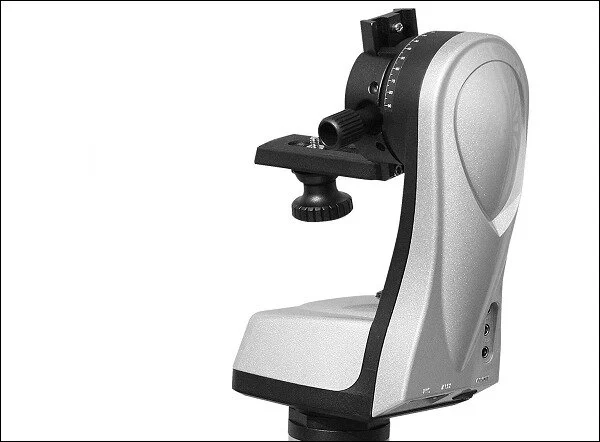
7. Motorized head. Another technical element that can give extra movement to your time-lapses is the motorized head. While in principle this accessory is designed to hold an astronomical telescope, many time-lapsers are using these heads as a cheap way of doing pan and tilt. Perhaps the most popular is the Merlin, partly because of its low price and ease of use thanks to the remote that comes with it.
8. Extra batteries and grip. Something that shouldn’t be missing from your backpack is a good arsenal of extra batteries. You will never have too many, especially if you work in extremely cold areas, where they last much less. While it is true that the original ones last longer, sometimes the price becomes decisive when compared to clonic ones or third party manufacturers. If your camera supports a vertical grip where you can hold a couple of batteries, it is worth buying one to double the autonomy of the camera, especially if you like to shoot long sunsets or night time-lapse.
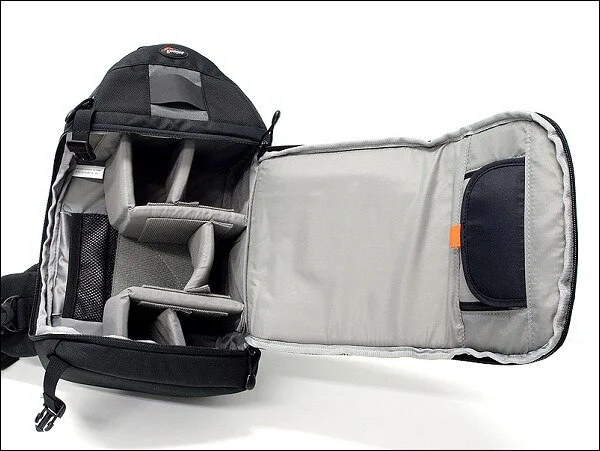
9. Backpack. One of the most practical accessories is the one that will keep and protect all of the above. On the market there are plenty of models from which you can choose: large, small, shoulder bags, with wheels… You should choose the one that suits your equipment best, where everything fits nicely and doesn’t leave too much free space. In many cases they are expensive, but they are a good investment. Just think of what you have inside to protect…
10. Cleaning kit. This is the typical accessory that we always forget to buy or we leave at home. And yet, in the expensive world of photography there is nothing so useful and inexpensive as a blower, lens tissue and a few sticks to clean the sensor. If you know how to use them properly (otherwise it’s better to leave the task to technical service), these are the three basic elements of a good cleaning kit. There is nothing as frustrating as having a time-lapse of 250 or even 500 shots with a hair, dust particles or drops on it.